BEAUTY

Sunless Tanner Favorites! + how to get glowy skin all summer long

Hi guys + happy Memorial Day weekend!

As I am now a T E X A N (let that sink in for a sec) I have 100% stepped up my self tanning routine. In the last week alone I’ve shaved my legs 3x and completely done this routine twice, and parts of it almost every day. That’s how you know it’s summertime where your new state’s climate is like what your vacations were all of your life. I still feel like I’m on a vacation. But there’s way more bugs here.

I’ve never been one to get naturally bronzed quickly or be that kid who went outside and 30 minutes later had a tan line, because the only lines I’ve ever gotten are sunburn lines. I have that good ol’ Irish baby blood that keeps me nice and fair year round. With the exception of my tanning bed usage in relation to homecoming and prom, I never naturally gained color without a lot of time and commitment and a deep deep burning desire to be a brownie. Which dwindled as I grew older, got a job, went to college, etc, etc.

With that being said—I am absolutely no stranger to self tanner, sunless tanner, tanning lotion, foam, mousse, wipes, spray, tan in a can—you name it and I’m sure throughout the years I’ve tried it.

Today I wanted to share with you all my routine since this is one of my most F R E Q U E N T L Y asked questions from you all since I talk about tanning wide open, 24/7—I love it, what can I say. And really give you guys some tips from personal experience, products that are my allstars and how I do this thing. So without further ado: lets get down to the nitty gritty.


P R O D U C T S

Okay, remember like 10 seconds ago in your head, you read about how I’m no stranger to products? And tried them all? Trust me when I say these guys matter—because they do. Sunless tanning is one of those categories that you need to do your research in to make sure you don’t look busted: especially in the untimely event that you’re doing this before a special occasion, graduation/graduation party, first date, wedding—you get the picture here.

Here are the products I use on the reg to ensure that I make everyone think I woke up like this:

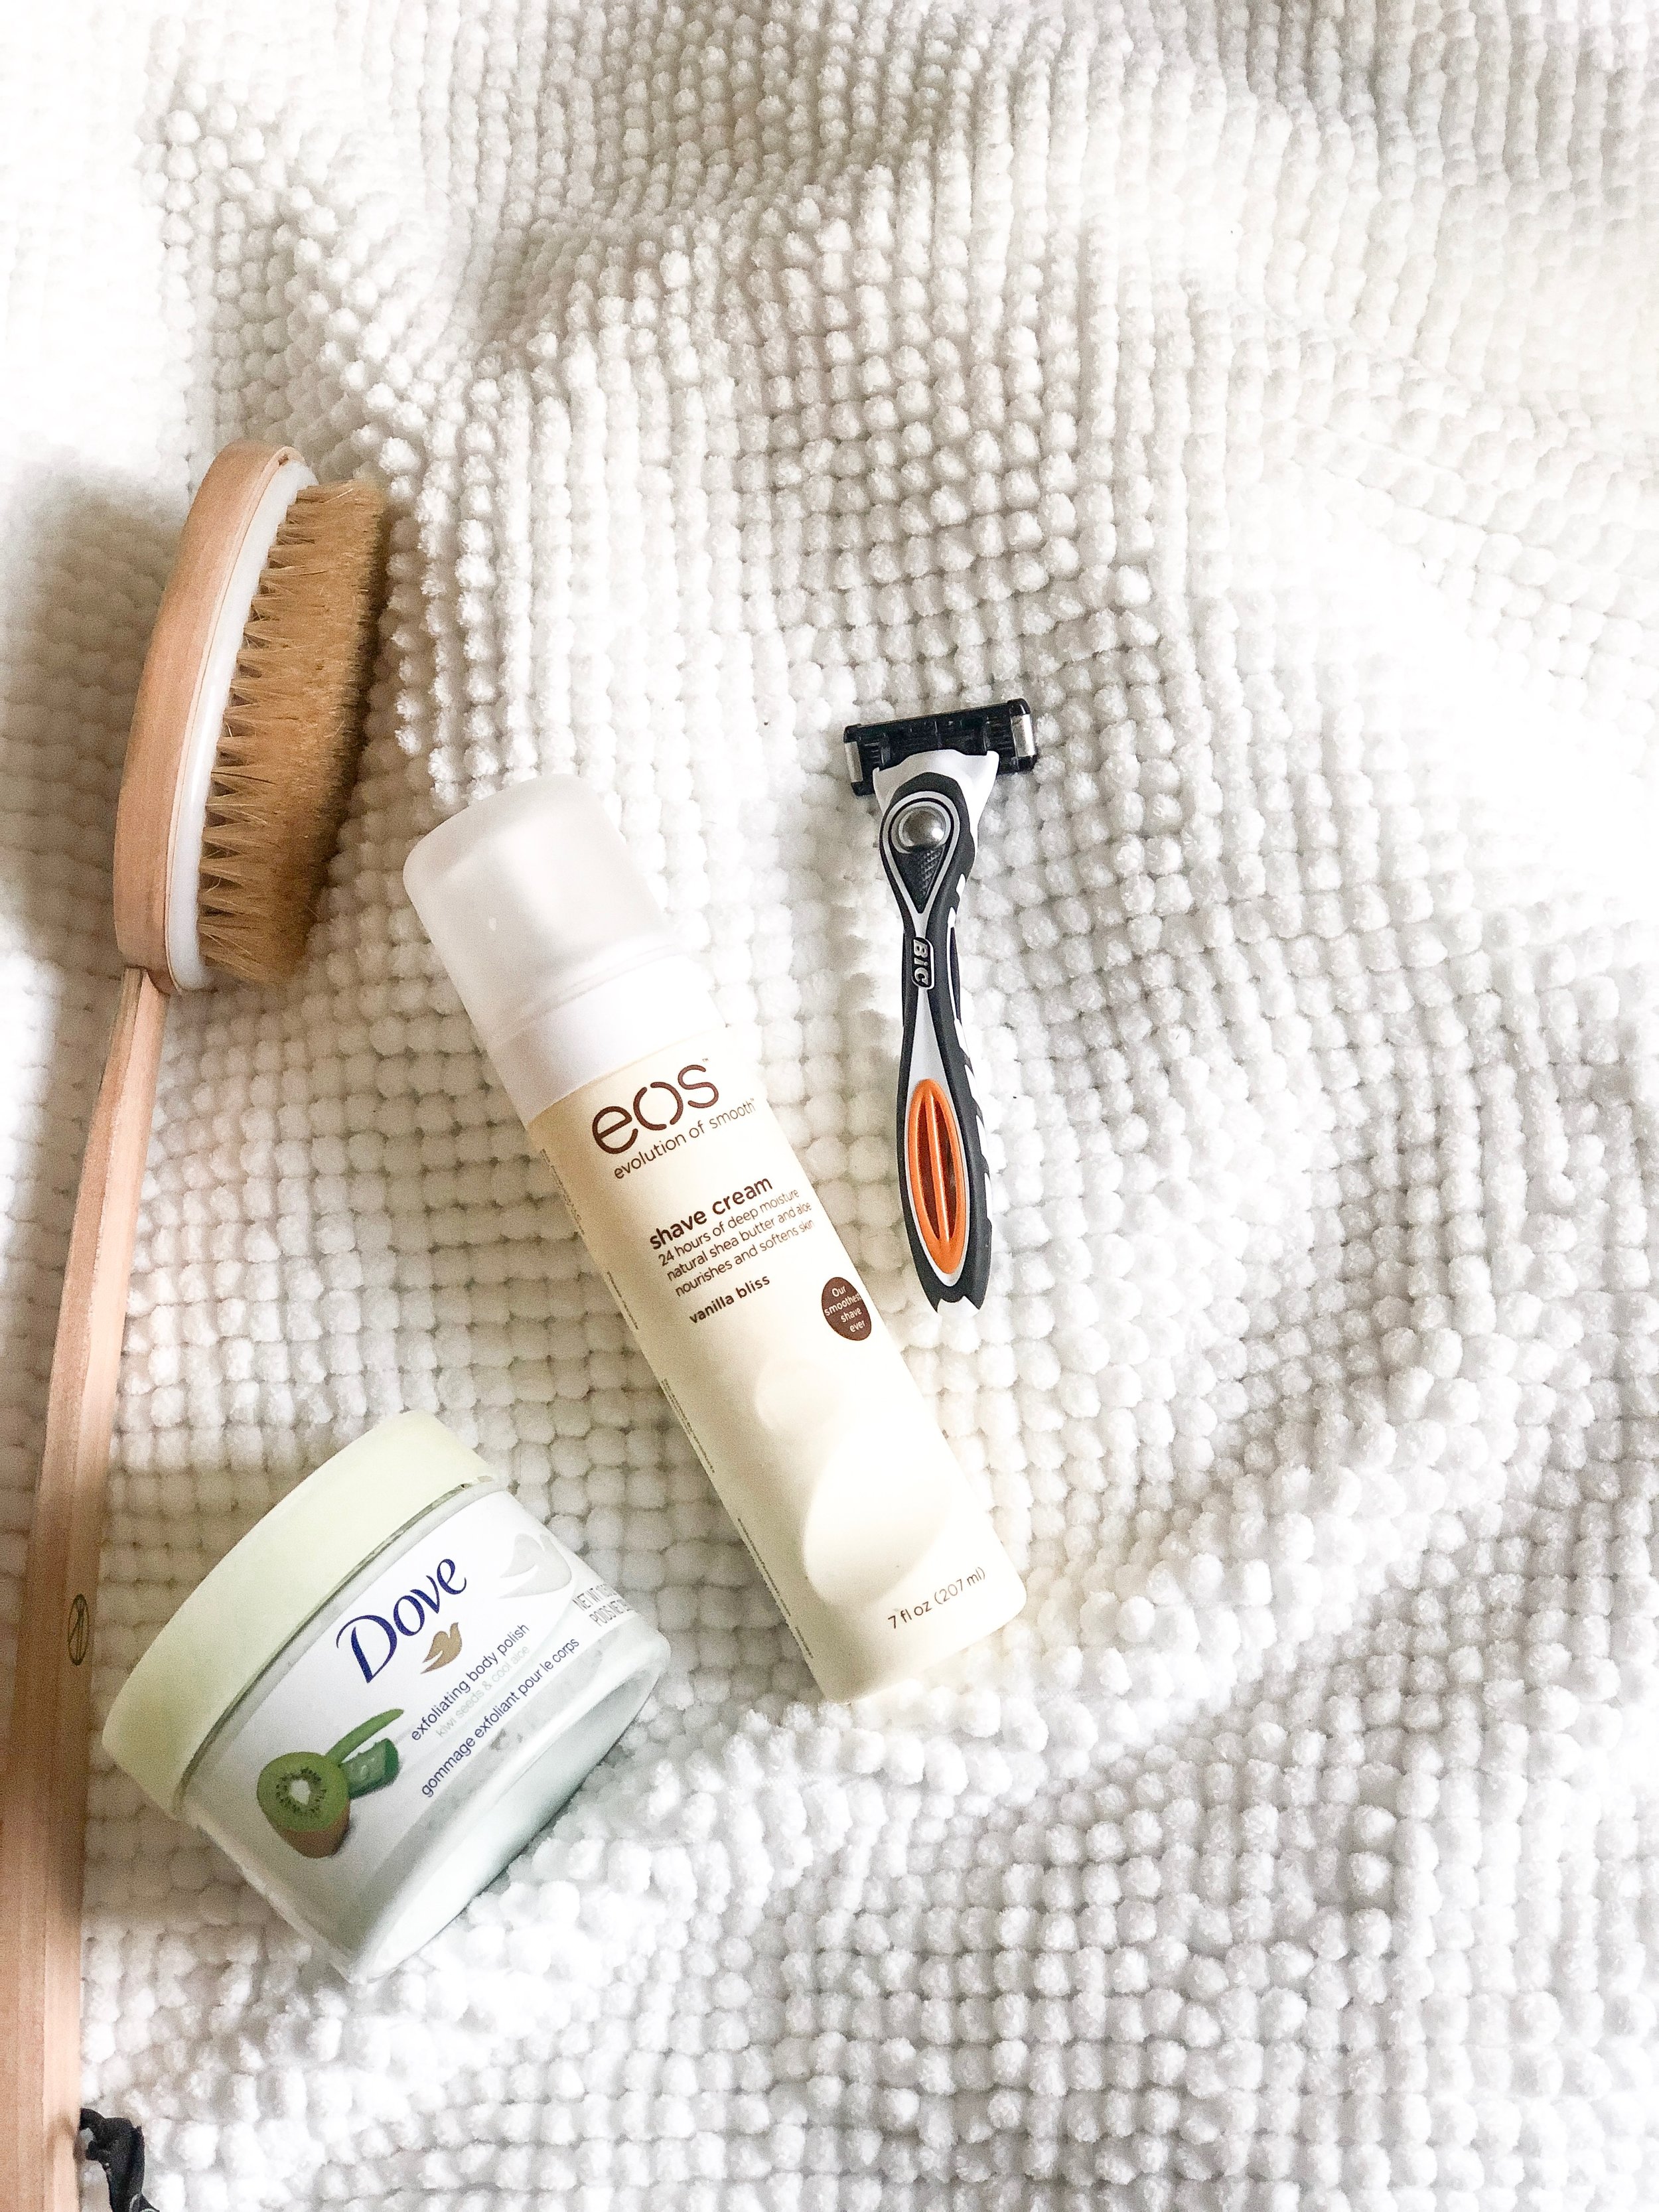
exfoliant/body scrub: there’s a million and a half options out there in this category, but speaking for my skin I prefer a more fine grit texture instead of a sandy or thickly cut salt or sugar scrub, just because with my skin texture + sensitivity level this doesn’t leave me feeling literally raw and like I scrubbed my literal skin off post use. The body scrub I’ve been using for the past few weeks and absolutely digging is the ponds body polish in the scent kiwi seeds + cool aloe. (this scent is a total knockout)

exfoliating brush: if you can relate to the bermuda triangle on you back in-between your shoulder blades; the area that you literally cannot reach for the life of you, this item needs to be added to your shower stall. If you think about it, the skin on our back gets in depth exfoliated so rarely, because there’s such noticeable area that we just can’t access—unless you’re made of elastic. This brush helps me keep my skin tone even in between applications and keeps my skin looking and feeling smooth and makes me have that extra dose of confidence to wear whatever top I want without running the risk of exposing myself and my fake caramel ways. (this has changed my life + I use it nearly every time I shower)

shaving cream + razor: I totally get not wanting to shave all that often, trust me—I do. BUT I can tell you honestly, if you take your time to do this whole routine flawlessly and look golden and beautiful, but then have to shave your legs the next day; long story short you’re going to shave off all of your hard work, so just do yourself a solid and keep this one before the application gets started. A L S O —self tanner just doesn’t apply as evenly or as smoothly over hairy legs to be honest. If you don’t believe me, test it out. But I can save you some time and just tell you you’re going to need to cut the grass before you begin. (EOS works wonders for my dry skin + a mens razor is a must have)

moisturizer: keeping your skin soft and smooth begins and ends with adding moisture and oil to the surface of your skin. If you’re totally prone to getting that winter skin, or have dry skin naturally, make sure you’re using a heavy duty body cream or thick lotion for this step. Having evenly moisturized skin makes your tanner go on much more smoothly, stay even and look much more natural. (GOAT is Cera Ve)

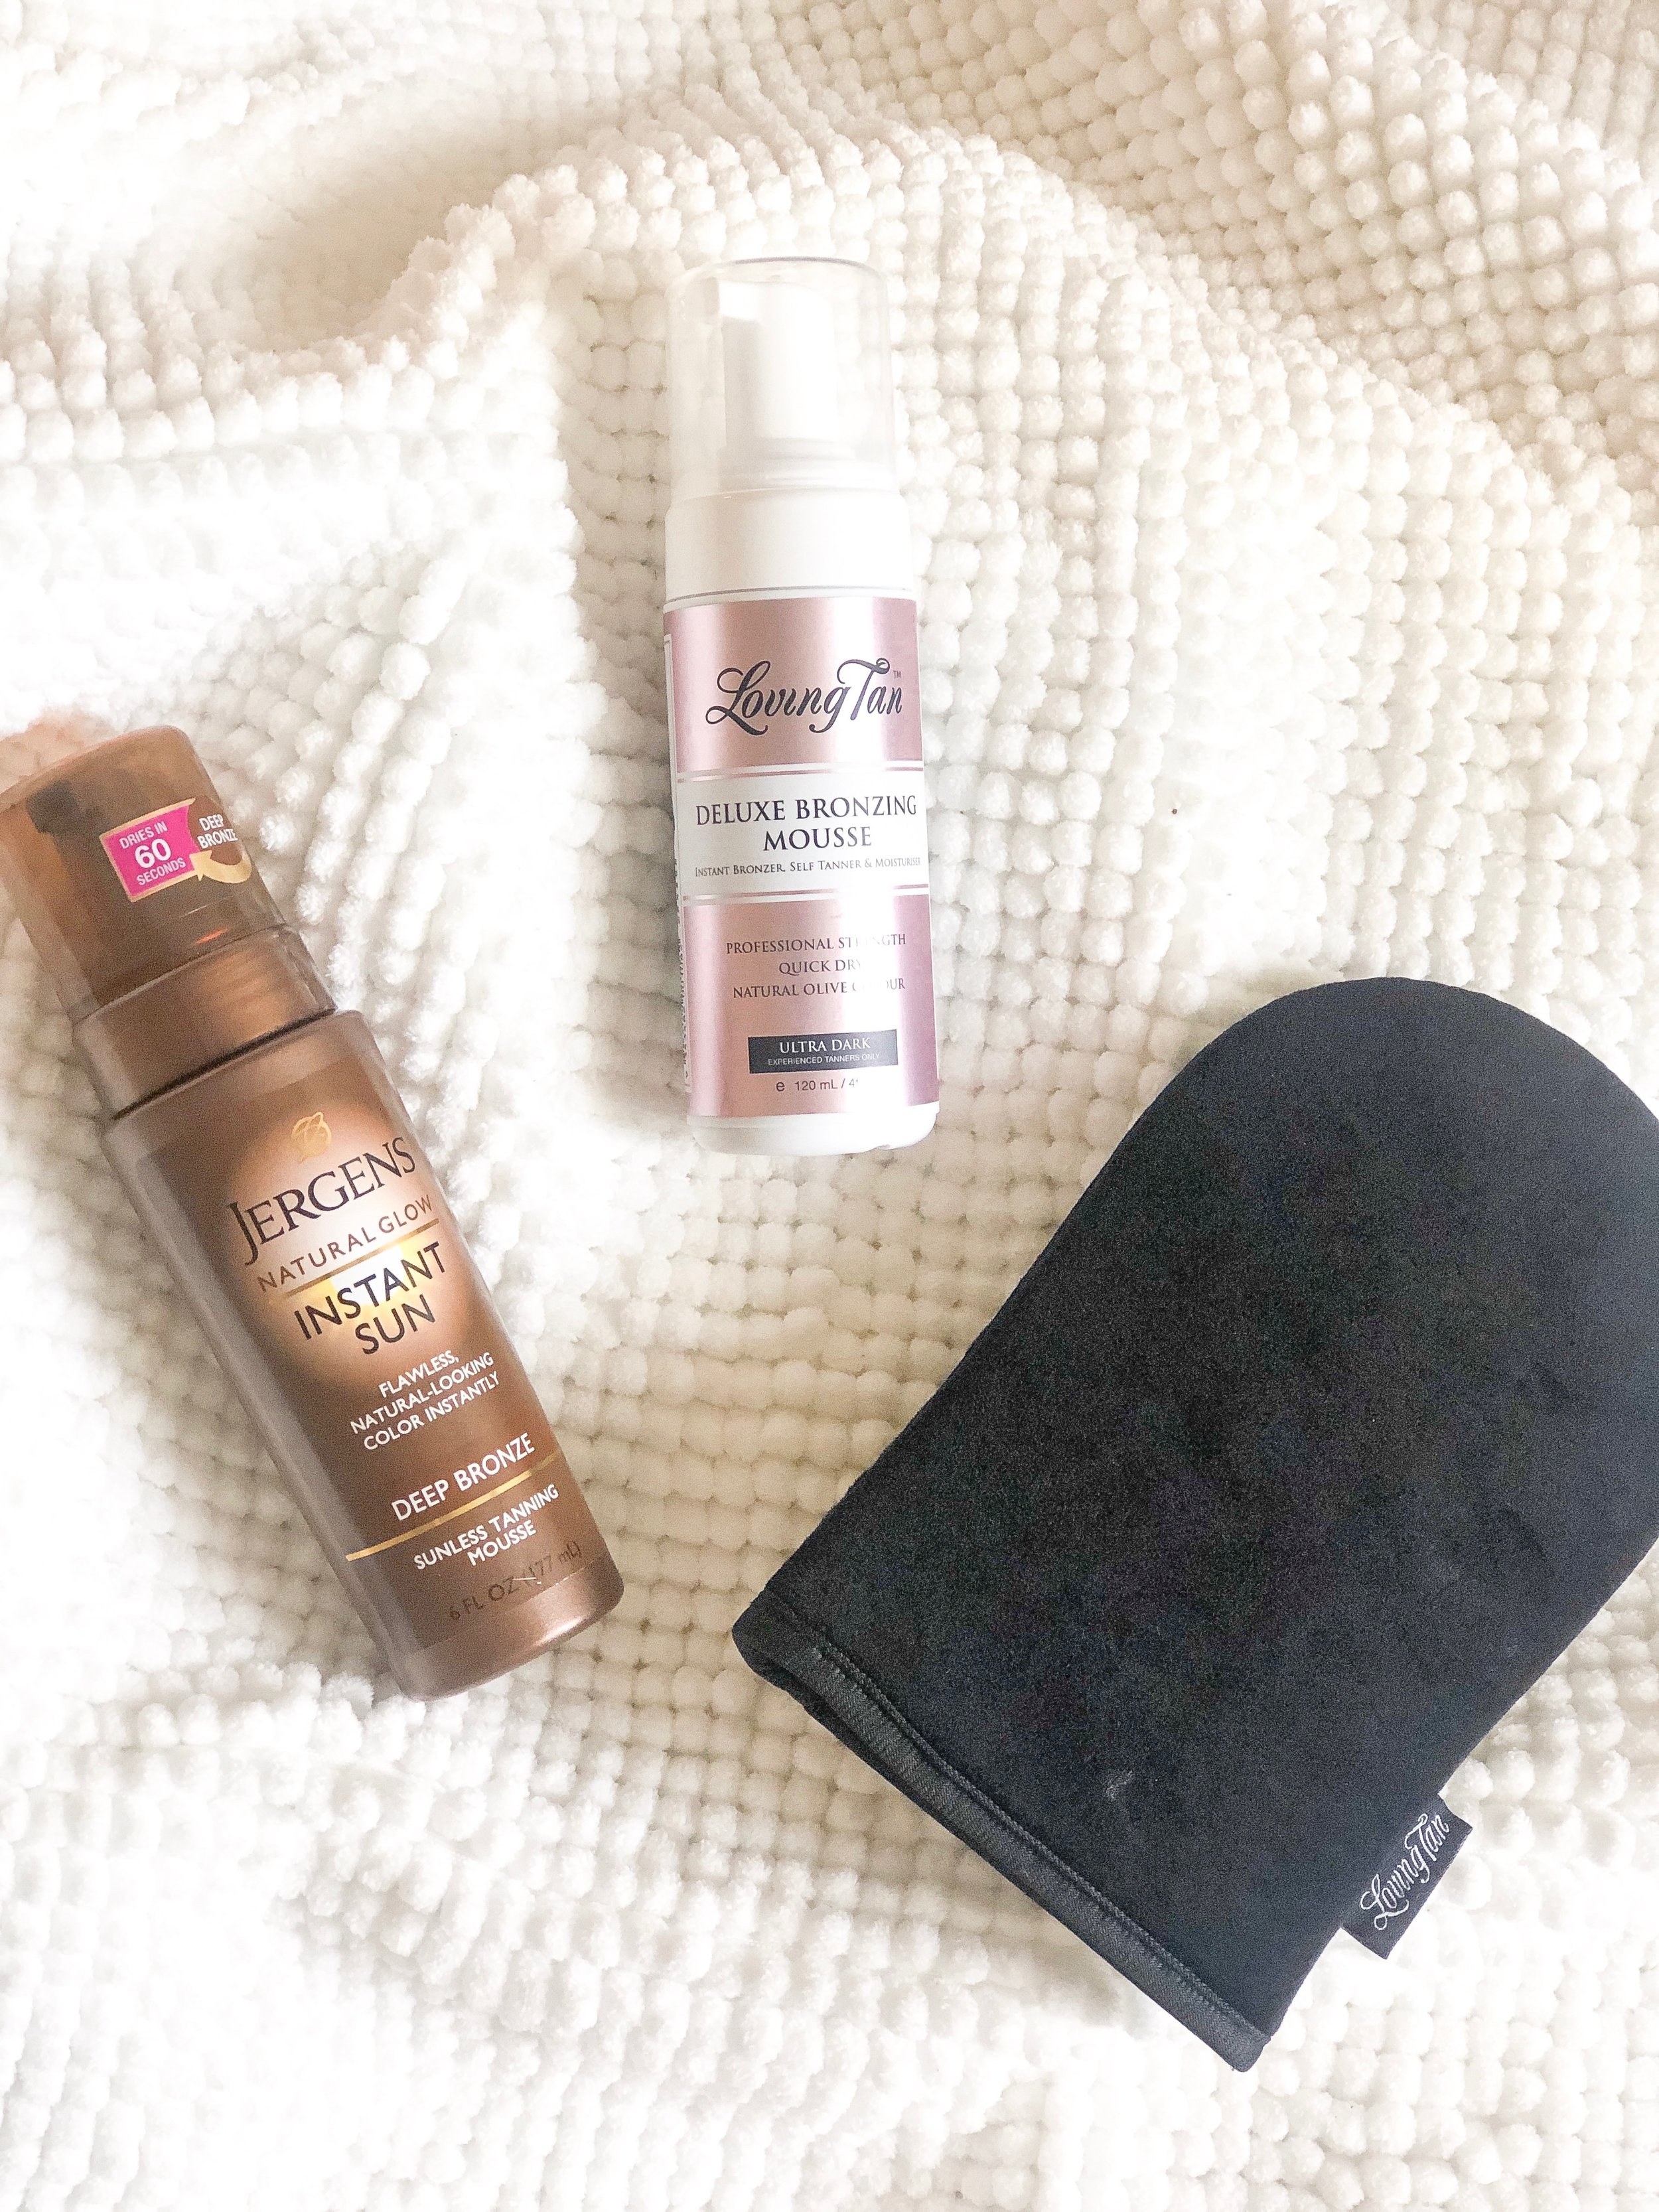
self tanner: finally—we’ve made it to the most fun product here: the one that let’s us temporarily dye our skin for fun. No, really it’s so fun. When I say I’ve tried every format of product on the market, I mean it, I’ve tried it all. My favorite by far is foam. Having a mousse-y type solution allows you to have the best of both worlds all around: lightweight application, quick drying, quickly absorbs into the skin, instant “bronzer” or color that shows where the tanner has been applied/where still is bare, and really lasts a lot longer + provides more full body applications than any other product I’ve tried. Mousses of all kinds have my heart, but bonus points if they make me small, dark and glowing. (favorites are jergens + loving tan)

self tanning mitt: if you’re a complete noob in this realm and you’ve never used one of these guys before this is going to 200% change your whole impression of at home tanning. Utilizing a mitt helps in so so so many different ways and I honestly N E V E R apply tanner without it because if I did I would look absolutely busted. In either case, this is going to be an oven mitt looking contraption that buffs out the tanner while it’s applied and protects your hands from being orange as all get out. (all time favorite and the only one I use is from loving tan. it’s a velvety material instead of foamy like a sponge and doesn’t absorb all of the tanner while also making it smoother all around)


A P P L I C A T I O N

Alright, time to get down and brown here—it’s about time.

Here is the exact system I use to apply my self tanner, products used in their exact order and giving you verbatim my life’s work in this area. Let’s begin in the shower.

I N S H O W E R

STEP ONE: EXFOLIATE.

Think about it: if your skin has layers of skin upon layers of skin, that skin shedding every hour of the day, forms a layer on top of your skin. If you shave before exfoliating, your shave can only be as smooth and flesh with the amount of skin that’s dead, sitting on top of your healthy and living skin. Make sense? If you exfoliate prior to shaving, it removes that outer dead piled up layer and allows you to shave much much closer to the hair follicle resulting a very smooth legs that you tell people to touch since they’re so very smooth.

This is when I would take a scoop of the body polish (enough for one limb/area at a time) on my gloved hands and exfoliate the best I can in circular motions all over my body, focusing on any build up of tanner or dry spots like knees and elbows. After exfoliating what I can reach, I’ll whip out my shower brush and exfoliate my shoulder blades and upper mid back with the brush to make sure I’m nice and smooth in this super foreign and distant area of my bod.

STEP TWO: SHAVE. https://www.bustle.com/articles/166899-11-shower-tips-that-make-shaving-a-whole-lot-easier

This is one part of this routine you need to make sure you’re not rushing through. The skin on your body actually does best to shave at the very end of your shower. Your skin is able to soak up all the hydration from the warm water and steam, and makes it much easier to get that smooth baby skin we’re after. So try to leave this guy at the end.

My absolute favorite shaving go to’s are always: a mens razor with 5 blades to give me a fighting chance starting off and a moisturizing shave gel or cream. Moisture is key to keep this baby running at top speed.


P O S T S H O W E R

STEP THREE: MOISTURIZE.

I think I’ve stressed this so much already but if you still doubt me, try only lotion-ing up half of yourself before applying tanner and you’ll 100% see the tragedy I’m going to try to prevent you from going through. Without hydrating your skin after the shower, you’ll have an uneven tan on any dry patches of skin and self sabotaging your seamless finish which is essentially skin treason.

When you apply moisturizer make sure you really get in there with a healthy coat, and then either have yourself some towel time or robe time for the next 30ish minutes, or until your skin feels like it’s absorbed up all your lotion. When you feel like it’s all soaked in, you’re ready to apply your tan juice.

STEP FOUR: ITS SELF TAN TIMEEEEEEEE.

OKAY grab your mitt, grab your favorite tanning product and let’s get to the application. F I R S T please for your own sake shake the bottle like your life depends on it, because depending on what situation you’re tanning for, it definitely could. If I’m in a position where I have absolutely zero tanner on, I’ll do my first coat a little heavy handed to make sure I get a good foundation on first. If I already have a little color to my body, I’ll go in with just the normal-light amount to make sure I stay looking even and smooth all the day long.

My best piece of advice here is to work in small areas at a time. I usually start with my mitt on my left hand, and apply it to my right side starting from the bottom working to the top. So my usual map goes like this: right lower leg/foot, right upper leg and booty, hip, tummy, chest, right shoulder, right bicep and right forearm, and then switching hands with the mitt to my dominant side (righty tighty) and repeating the process on my left side. I apply this lastly to my back, neck, hands (make a claw shape and avoid the palms, use excess on mitt) and then lastly my face.

Everyone has their own opinion of if self tanner should go on your face or not but honestly my skin is fine with it and it lets me skip a few steps in my makeup routine, so I’m all for it. I will say a tip of advice to any of my grey haired/blonde babes to be extremely careful around your hairline. If the color you’re using is darker than your hair (which it probably is if you’re blonde or white) the tanner can grab onto your hair and stain your hairline and cause a brown or orange cast around your face which is scary and not the look you’re going for. I recommend always having your hair up in a high bun, baby hairs clipped up and a headband around your head to be as careful as you can.

Depending on the day, I’ll ask Lance to come in and buff out my back and make sure I look even and smooth, but honestly I really don’t worry too too much about my back, since for me it’s at least covered by a tank top 95% of the time. I did find this super cool gadget here that I’ll link for you which is specifically designed to be a self tanner tool to help get your back—life changing. (self tan back applicator linked here )

In my application I really make sure to work in the product before getting more in that area, as well as using circular motions to apply to avoid literally any streaks of any kind. + Be sure to let yourself completely D R Y before getting dressed. Stand in front of a fan, wave your arms, dance around, who cares. The bottles sometimes say ‘dry in 60 seconds’ but seriously act like that’s not there and don’t mess it up, just wait until you’re good and dry to test fate.

Whew that was a doozie.

STEP FIVE: THE OVERNIGHT

Depending on the tanner you use this could be totally optional. I’m a nutcase and literally sleep in any self tanner I ever put on my body regardless of if it says I should shower in 2 hours or whatever. I take it very personal and say things like “you don’t know me” so I can just absolutely disobey their instructions but hey knock yourself out, to each their own.

B U T while sleeping, I will tell you that I have a few pairs of jammies that have permanently been covered in self tan which are not cross contaminated with other pj’s at this point—they’re too long gone. This consists of a L O O S E long sleeve t-shirt and L O O S E fitted pants and socks if I have light colored sheets on the bed. One of the most important things to do is right after you’ve applied tanner is to not sleep in a bra/underwear. You want to sleep in something loose, so the tanner has time to soak in and absorb totally to your body, any tight clothing like underwear are going to rub that application off and cause it to not absorb as it should or will give you an uneven finish, but again this is totally your call here.

STEP SIX: THE MORNING BUFF

Okay you’ve made it through the scrub, the shower, the sunless and now you’re looking to smooth.

The morning after you wake up from this ritual, the best thing for you to do is to rinse off in the shower to get off any extra color to prevent staining your nice clothes, and then after you’re dry to buff out any areas that maybe aren’t as pigmented, streaky areas, etc.

If it’s not perfect in the first application, this is definitely the best time to fix it. I will tell you a great great great product to keep in your holster for this one is the Sally Hansen Airbrush Legs tan in a can spray. This stuff can even out your skin like nobody’s business, and is essentially like body makeup. This stuff is sold by SH nail polish if you’re looking in person, so derail from the skincare aisle and check this out. If you ever mess up your application so badly but don’t have all the time in the world to fix it or a backup outfit to wear, this stuff is magic and will make your crap job look like an A+. (sally hansen airbrush legs linked here)


Alright friends, that’s it—that’s my extremely long, in depth self tan routine and every product I use to make this come to life!

If there’s any questions you guys have or any point you want me to go more in depth with drop you questions here or on my instagram and let’s chat!

Thanks so much for everything guys, have an awesome rest of your week. Talk to you guys all in my next post!

Olivia

Hall of Fame: Target Beauty Product Edition

Hi guys!

This week I wanted to share some of my absolute, hands down, all time favorite products with you that all pertain to the world of b-e-a-uty. As if that last sentence wasn’t good enough, all these products give you an excuse to hit up everyone’s favorite store; Target (also known as tar-jay). I know, I’m laying it on thick.

I like to try new products as much as the next gal, but seriously if I find something that works absolutely perfect for me, I will rarely if ever change my routine up. Like we’re talking years on end of repurchasing products over here. Hey, at least I’m loyal to the queens in my makeup bag.

Throughout this post I’ll let you know some of my original favorites, some newer and some I wish I found much much earlier than I did. Only so I could love them longer. I throw my debit card if I am within arms length of these products because I have no self control with makeup. Or food, or just Target in general.

Apologies in advance for how long this is. Sue me. But I’m a bit of a makeup fiend and odds are if you clicked on this, you’re one too. Welcome to the party, lets get this rolling.


I have 12 products to share with you guys and they’re all broken down into: eyes, lips and face, so feel free to scroll accordingly to find what you’re looking for!

I’ll also link everything that I talk about at the bottom of this post, just so it’s way easier for you to find later if you need to.

But for now, lets get started since I have a feeling this will be a long one!


EYES

Ah, the windows to the soul. If I could pick one product to use for the rest of my life, I would pick either a brow pencil or mascara. My love for eye makeup runs very deep, since it makes such a huge difference since my brows and lashes are naturally super light, I never skimp on an opportunity to slap some of that magic on my face.

DUO Lash Glue

Okay this one is an all-time favorite for me! From high school dances like prom, sorority formals, and any other day I’ve ever worn lashes ever, this is absolutely what I used to apply them.

I don’t know about you but I have trust issues: especially when it comes to that janky little cheap bottle of who-knows-what kind of glue that comes with your lashes. (you know the one). Let’s save ourselves some heartbreak here and level up to an appropriate adhesive that even got my lashes through my wedding day. Impressed yet? This stuff is no joke.

Also I only ever use the clear glue, all based on preference. I don’t like applying it with the black finish glue, because while I was still getting used to applying these babies, and even still now, glue can be messy. It gets on your fingers, eyelids, countertops, etc. if you’re not careful. So I play it safe and always stick with clear, but you can take your personal liberties on this one.

Ardell Demi Wispies

If you’ve ever seen me wear false lashes I can tell you 9/10 times I’m wearing these bad boys. I’ve never had a pair of Ardell lashes that I didn’t like. The brand has a good reputation for a reason: they’re products rock and are made at a super affordable price point but also with quality high enough where you can re-wear your lashes 5+ times with the right TLC.

I found this style of lash about 1-2 years ago now and I’m absolutely their biggest fan. For my eye shape + size, these check every box I need them to from style, size, durability, and make me a little extra flirty inside and out. Lance loves these babies.

ELF Instant Lift Brow Pencil

GUYS. Of all the products I’m telling you about, this is one of my new holy grail products. Best part? IT IS $2. TWO DOLLARS. Stop what you’re doing and buy this. It is worth every penny. All 200 of them. Also let it be known that this is 100% the best dupe I’ve found for the Anastasia Beverly Hills Brow Wiz which retails for $21 and contains HALF the product that ELF does. ABH at 0.003g and ELF at 0.006g. (referenced from ULTA.com) Seriously, shall I say more? I think I shall.

I’ve been a eyebrow penciler-inner for a long time, I’m talking 5-6 years, before it got super cool and common to have those brows sister S N A T C H E D.

This ELF brow pencil is all of my favorite things combined: retractable (because who ever has a sharpener when they need one?), shades ranging from blonde (which is my poison of choice) to black and even having an auburn shade, and it’s cost effective and works as well as any other brow pencil I’ve tried. Oh and did I say it’s $2? If you get one product I talk about today, put this bad boy in the running.

NYX Jumbo Eye Pencil in Cottage Cheese

If you’ve been watching YouTube videos since the stone age of the late 2000’s like this girl has, you definitely have seen this product in action before. These guys were in almost every makeup tutorial I watched in the early days of the internet, where people filmed on flip cams and where editing was non existent.

This is one of my favorites, and one I’ve used off and on in different colors for years. During the phase of cream eyeshadow, I had so many of these guys in pinky tones, brownie tones, black, you name it, to pop on my lid, blend it out with my finger, line my eyes, and I was good to go.

These days my most used shade is pictured above in Cottage Cheese, a light + bright creamy-whitey shade with shimmer. Super easy to use as a base under any eyeshadow look, highlighting my inner corners, or my most used method: water lining my eyes with it. Also I feature this guy in my face favorites because I honestly highlight my face with it when I’m feeling lazy. Nose highlight, cupid’s bow, brow bone: drooling.

I always am going for that doll eyed look with thick dark lashes, pinky cheeks, and bright eyes, and this product definitely makes such a huge difference in my look. This can take you from 5 to 8 hours to sleep in 30 seconds.


FACE

If there’s one part of my makeup routine that takes me the longest to execute perfectly: it’s 100% my face products, with brows as a close second. I am a firm believer in starting with a good foundation (literally) before anything else. Having a nice even base as a clean slate to start your artistry is literally

E V E R Y T H I N G.

Maybelline FIT Me Foundation

This foundation has been a newly used + abused product by yours truly. You’ll see I have two colors shown above and two different finishes. I have my everyday shade as 130 in the matte finish and I mix in shade 220 in the dewy finish on days after I’ve recently self tanned, get that matchy-matchy look between my body parts. I have standards.

I originally picked up this foundation on a whim almost solely based on price, and babyyyyy I’m here for this product. Also just putting this out here that this is a very medium coverage foundation, maybe more on the light-medium end of the spectrum. Which personally is my favorite to use day-to-day.

I remember using this foundation back in the day, when it first came out and I remember even liking it back then. So good on you Maybelline, way to make affordable options that actually have a pretty impressive application and wear time.

(I still STAN my L’Oreal as the best foundation I’ve ever tried, but for the same price as 1 L’Oreal, I could get 2 Maybelliene products, which I also am here for.)

Maybelline Master Conceal

This. Concealer. Is. The. Best. It’s a 10/10 from me.

I am obsessed with this concealer on another level. I love this for blemishes, under eye/eyelid, carving out my brows, outlining and edging up lipstick where needed.

I live by shade 20 and have repurchased this product 5+ times in the past year. I bought this to hold me over one day when I ran out of my Shape Tape, but honestly after trying this I never repurchased Shape Tape again.

I think this concealer is definitely a huge bang for your buck and also lets you squeeze out every last drop of product to save even more cash. This is a huge, underrated drugstore gem that you should definitely give a shot. Best drugstore concealer I’ve tried yet.

ELF Baked Highlighter in Moonlight Pearls

This is one of those “I wish I bought sooner” products because, boy do I ever wish I did. I’ve spent years blowing my money on high end level highlighters, and even though they do work, I can’t justify the price difference on a regular basis unless it’s actual magic.

This product from ELF comes in 3 different shades which accommodates just about everyone’s skin tone and undertone. I personally use the lightest color in Moonlight Pearls, because I love the sheen and tones, and also I would look like a New Jersey mess if I were to use the darker colors on my face. But if you have a darker skin tone than I do, they definitely would have deeper tones that would flatter you as well, no problem.

I almost always throw this on my brow bone, inner corner, occasionally my lid, nose, cupids bow and cheek bones. I’m still super into that highlighted look from a year or two ago, and I don’t see it passing any time soon.

The only thing I wish I could change about this product would be a “softer” consistency, because occasionally (especially on a brand new package) I feel like I have to work my brush in the product to get enough on my brush, or find that around my eyes I will wet the brush to get it more adherent to my skin.

But for $4 and that color pay off? S O L D.

BH Cosmetics Classic Blush 10 Color Palette

You can totally tell from the photo that I love this palette. It’s scratched, dinged up and has been loved on for almost a year now. My everyday shade in this palette is this peachy pinky shade (center, bottom row), which is absolutely perfect for my skin tone in my opinion.

I think this palette could be extremely workable for everyone of all skin tones, especially with such a wide range and such highly pigmented shades that are able to be built up or mixed until they’re the tone of your dreams. Especially if you’re into makeup artistry, bridal or event makeup, this would 100% be an affordable product to add to your kit, that actually has really great color payoff without the steep investment of 10 individual blush colors.

I’ve bobbled between a few blush shades since I’ve had this palette, and even still I don’t see myself running out or adding any new blushes to my collection any time soon, thanks to this baby. Love u BH Cosmetics.

BONUS: Pond’s Cold Cream

If you’ve followed me since my days of having my own channel and my beauty guru efforts- aka my skincare routine (cringe), you’ll know how obsessed I am with this product.

This was the first makeup remover I’ve ever tried and by far my favorite. Regardless of this one having it’s time in the sun back in the 1950’s, the way this works is still second to none.

This stuff dissolves waterproof makeup, liquid lipstick, gelled down brows, and eyelash glue like its nothing. A tub this size can last me 2-3 months easily and works wonders for my normal-dry skin.

TRY THIS ONE! This is my all time holy grail, regardless of how old school this product may be, it works like a charm.


LIPS

I don’t know about you, but I don’t wear lip products every day, unless it’s vaseline and burt’s bees. But when I do wear lipsticks + lipgloss during the week, these are the ones I reach for more than anything else in my collection, and they’re all from the drugstore.

ELF Lip Plumping Gloss

I’ve seen lip plumping products become increasingly popular in the past 2 ish years after Kylie Jenner’s Cosmetic line hit the market, and the Kylie Lip Challenge started to pop up everywhere, and for good reason: they’re A W E S O M E.

This family of Lip Plumping Glosses come in so many different shades and all have the most gorgeous shiny finish. If you’re not into the minty tingle to the lip plumping glosses, this one is a good product to ease yourself into the water with and also doesn’t make your lips huge and dark like other plumpers out there.

My personal favorite shade is a light light pink by the name of Pink Cosmo. Absolutely gorgeous and pairs well with my next favorite lip product I’m about tell you about.

Maybelline COLORSensational Lip Stick

Ta-da! This is my most worn lip product of the year so far. I have a few lipsticks in this line, but my most favorite is shade 655 Darling Nude.

This baby has a soft matte finish, that leaves your lips in that perfect spot of being just barely light pink but not corpse level of orangey nude.

Maybelline totally hit this nail on the head when it comes to their formulation of matte lipsticks here. They’re not drying, they’re soft, they’re wearable, and they’re an absolutely huge range of shades.

This lipstick mixed with my ELF gloss is my go-to lip look for any given occasion: date night, job interview, church, work, you name it. This is my ride or die combo, that both look good together and solo. #lipgoals

Maybelline Vivid Hot Lacquer

Who knew I liked Maybelline products so much until today? I sure didn’t!

This is my absolute favorite in the liquid lip category. This stuff comes with the best shaped diamond-esc applicator, easy to overline your lips with, and is absolutely so flattering when on.

I love the consistency of this, since it sits somewhere in-between a liquid lip and a thick gloss..that’s not sticky. The best I can do to describe this, is if you literally melted a lipstick and it stayed runny forever: that’s where this one lives. Not too sticky. Not drying. Very pigmented. Extremely weird but awesome? I’m totally on board with this one here.

My go-to shade is #62 in Charmer, and boy oh boy do I turn into a little charmer in this one. Okay not really but wow I love this shade, love this formula, everything. It’s like that little extra that makes me stay feeling myself throughout the day.

A+


Okay guys, if you’re reading this—you made it through my most mouthy post yet: bless you.

If you have any questions or want me to go into even more depth in regards to any of these products or have any favorites of yours that you’d like me to know about, drop me a line down below!

A L S O—this is my first time ever messing around with flat lays and I think I found my new favorite activity ever. Let me know what you think about these curated images in the comments, and if you have any experience with photography or flat lays in general holler at me!

Talk to you guys in my next post here in just a few days!

Olivia


Products Mentioned: